If you enjoy what you find here, be sure to subscribe or become a follower so you can stay up to date with all my bloggy goodness.
Showing posts with label sewing. Show all posts

Sunday, April 17, 2011

the best of both worlds: fabric and crochet toddler dress

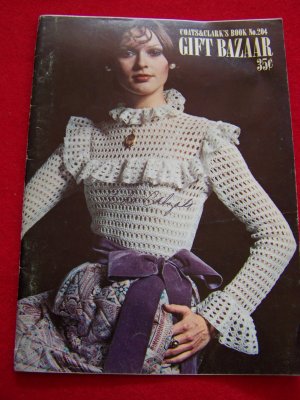
When I was a child, crochet magazines used to be a staple in my Granny's home.  While I think she mainly made afghans and doilies, I remember that these little tutorial books often featured clothing.  Exceptionally tacky clothing.  At the age of 5, I swore that I would never wear a crocheted cardigan.  Ever.

source
 My Granny did teach me to crochet a little, and my Grammie followed up with real lessons.  If a solitary stitch was incorrect, I had to pull the whole dag-gone thing out and start again.  It was torture at the hands of an old lady, truly.  But, the lessons taught me to work carefully and take pride in my finished product.

I never finished a project, though, because I worked so slowly.  I would get bored quite easily.  Finally, as a teen, I fashioned a doggie sweater out of granny squares.  Then, as a young mother, I made a monstrous afghan to top my son's bed.  I made it full-sized, so he'd be able to use it forever.  After all, every young man wants to tote around a giant heavy crocheted blankie that his mommy made when he was a baby.

Over the years, I've worked on other projects as well, but always in spurts.  I've made scarves, baby blankets, and various things.  I have, however, never finished a doily or toilet-paper cover.  So, I'm not quite my Granny.  Not yet.

Then, a couple of months ago, I was perusing Prudent Baby, one of my favorite sewing sites, when I came across a tutorial for the Quick Crochet & Fabric Top.  Wonder!  I had stayed away from crocheting actual clothing because of the stigma it was assigned as a young child.  Besides, if I couldn't finish a project, or properly read a pattern more complicated than a flower, then how would I make an article of clothing that could actually be worn?

Anyway, I fell in love with the little shirt that was displayed that day.  I started a search for the perfect fabric, and then the perfect yarn.  Deciding to make  a dress instead of a shirt, I cut my pieces a little longer.  Wanting my daughter to be able to wear it more than one season, I also cut my pieces a little wider.  Then, I sat down to crochet.


Here's a hint: Make sure your chain doesn't twist as you're slip-stitching it into a circle.  I had to crochet that darn neckline three times before I had it right.  But, that was mainly because I wasn't working slowly.  I was trying to whip it out, and didn't pay attention to the details.  I added a second row of treble crochet, which made the neckline more substantial and allows it to really lay in a proper circle.  When I sewed it to the dress, I attached it so that the collar would fold down over the top of the dress as well.  I noticed that, otherwise, the collar stands out from the neck in a rather strange manner.  Altering the pattern in this way requires a binding of some sort around the neckline so you don't have unfinished stringies showing, but I used a piece of scrap ribbon on the inside and it turned out fine.


I also whipped up a little flower hair clippie to match.  To be honest, this is the first thing that I've made Katie that she has willingly put on when I was finished.  Most of the time, she runs and screams when I come after her with a new garment.  I don't know why, but she just prefers to shop.  Maybe she has the same prejudice against handmade that I had as a child.  Maybe I'm tormenting her with pictures of projects that I'd like to accomplish.  Or, maybe she just doesn't like to model.


Tuesday, March 29, 2011

cut it out

I have been working on this dress shirt to tuxedo toddler dress off and on for a couple of months now.  I can't tell you how many stitches I've pulled out to get it just right.  Yet, I'm still not there.  I'm just not satisfied with the dress and I would love your opinions.


I know I need to add a crinoline underneath, but that will have to wait until my remodeled and relocated Joann's opens in a couple of weeks.  The dress is a little on the sheer side.  I'm wondering if the puffiness alone will fix my worries.

However, I think the large collar may take away from the tuxedo ruffles.  I'm thinking about cutting the bodice straight across and adding summer straps in place of the puffy sleeves and collar.  What do you think?  Would you leave the design as is or change it up?

Friday, February 25, 2011

the littlest seamstress

Things were unusually quiet around the house last night.  Walking into the kitchen, this is what I saw...


She was rearranging the pins in my pin cushion.  Alex used to do the same thing, making elaborate patterns out of the different colors.  I sat down with her and we sewed for a little while, working on the tuxedo shirt dress I've had planned for a couple of months.  I was trying to get the puffy sleeves just right and Katie helped out by handing me pins as I needed them.  I realized that she has grasped the concept of pronouns.  Rather than saying, "Mommy needs this," she is now saying, "You need this?" and "Here you go."   Such a cutie.

Wednesday, February 23, 2011

celebrating the boy

One thing that I've noticed since I started sewing is that it is much easier to find girlie things to make than to find ideas for boy stuff.  I guess dresses, skirts, tights, hair bows, and frilly things are more plentiful in the world of online tutorials.  But, that doesn't mean that there aren't some really awesome things for boys out there, too.

This month, Made is Celebrating the Boy.  The lady behind the blog is featuring boy tutorials, ideas, patterns, and more all month long.  If that isn't enough for you, she's also provided links to the features from prior boy months as well.  And, if you're like me and you have an older boy in the house, lots of these ideas will work really well for the big guys, too.  I can't wait to try out the presidential shirts, made from freezer paper stencils.  And, I can think of at least one grown guy who will be receiving one of THOSE for Christmas this year.

So, go check her out.  Sew up something for the guys (or paint, or crochet, or modge-podge... you know, whatever). 


Tuesday, February 8, 2011

plaid jumper shirt dress

If you enjoy what you find here, be sure to subscribe or become a follower, so you can keep up with all my bloggy goodness.

Continuing with my men's dress shirt to toddler dress series, I recently finished this little plaid jumper made from yet another of John's old button-down shirts. Unlike the striped shirt dress, he claims that this was a shirt he actually still enjoyed wearing.  Oopsie.  I'm pretty sure I saved it from last year's yard sale pile, though.  Now, how it got there, I can't quite recall.


To make this little plaid jumper, I followed along with this tutorial by Made By Lex.   I did, however, change it up a little bit.  I added side panels with the pattern going the opposite direction for contrast, only used one pocket, and placed surprise pleats along either side.


See the tiny bit of pleating and the contrasting stripes?  I like how it adds a bit of modernity to an otherwise traditional style.  The straps don't cross in the back and I think they are long enough for her to wear this for quite awhile.  First as a dress, then as a shirt, of course.


Stay tuned for a pink party shirt dress and a lavender tuxedo shirt dress.


Sunday, January 30, 2011

fairy tale dress preview

If you enjoy what you find here, be sure to subscribe or become a follower, so you can keep up with all my bloggy goodness.

I've been working on a dress for Katie that reminds me of a character from one of Grimm's fairy tales or something. I have to take a trip out of town for fabric, or place an order online, because our local Joann's is moving and hasn't stocked since September.  How can a store go for six months before a planned move without getting in new stock?  It's like a fabric graveyard in there and they won't open in their new location until April.  April!  What will I do?  At any rate,  here's a preview of Katie's fairy tale dress. 


I have repurposed a red tee for the bodice.  The dress will have an empire waistline and puffy short sleeves.  The extra tee fabric became rose petals ringing the front neckline.  The fabric in the background will be a full circle skirt, attached the fabric and bordered by a wide baby blue double sash.  The bottom edge of the skirt will feature a red tulle ruffle.  Princess perfect, for sure!

Friday, January 28, 2011

striped shirt dress

If you enjoy what you find here, be sure to subscribe or become a follower, so you can keep up with all my bloggy goodness.

Late last summer, I came across a wonderfully cute shirt dress tutorial from liliash.  I knew right away that I HAD to make a dress for Katie, but not wanting her to outgrow it too quickly, I decided to wait until I could include it in this year's spring/ summer wardrobe.  I set aside some of my husband's unloved button-down shirts for just this purpose.  Stay tuned for more variations of this sweet little shirt dress over the next few weeks.


I bought this shirt for John to wear out to a club one night several years ago.  I thought it would be better than his typical weekend tee or polo.  Needless to say, he despised it.  He said it reminded him of a plastic straw from a fast food restaurant.  I think the bold colors are pretty and it makes a gosh-darn cute girl's dress.  The sash was made from a scrap of deep gray fabric and top-stitched in baby pink.

Sweetie Pie Katie seemed to adore the dress, though it is a little short.  (Measure twice, cut once, remember...)  I'll pair it with some skinny jeans for spring or some bright little ruffled bloomers this summer.

Make it!
Here's phia's party dress tutorial for turning a dress shirt into a dress.
The puffy sleeve tutorial can be found here.
I added a couple of little gathered pockets on the front, too.

Sunday, January 16, 2011

hey... it's a snuggie!

If you enjoy what you find here, be sure to subscribe or become a follower, so you can keep up with all my bloggy goodness.


The Snuggie Bar Crawl took Roanoke by storm this weekend, and my hubby and I were in on the action.  Organized by Get 2 Know 'Noke, young adults flocked to downtown Roanoke Saturday afternoon, decked out in their finest snuggie-garb, to eat, drink, and be merry.  Read more here.

Thursday, January 13, 2011

snuggie up

If you enjoy what you find here, be sure to subscribe or become a follower, so you can keep up with all my bloggy goodness.

In just two days, I will don a snuggie in public. Yes, I will. This is not a joke.

My husband and I are attending Roanoke's first Snuggie Bar Crawl this Saturday. Though I have never been bar crawling before, I'm looking forward to it. Maybe it is just because I can't wait to document a bunch of strangers making fools of themselves while wrapped in hideous blankets. Maybe it's because we're actually getting a whole night sans kids. Maybe it's because we're going to end the evening at a comedy show.  Or, maybe it is because I get to try to fashion my pepto-bismol pink snuggie into something I might actually want to wear.

image source


I'm thinking about cutting off the sleeves, shortening the garb to cocktail-length, and sewing up the back.  Maybe cutting a v-neck, or going for a more modest faux-v with the help of some ruffles.  Then again, I'm afraid I'll get cold, so maybe some 3/4 sleeves would be better?  We are going to be "crawling" from one location to the next, and I don't really want to take a coat.  I don't want to wear anything too short or too flashy, lest I be mistaken for a rather large, unsuccessful street-walker.  Or, Lady Gaga.  I think there's a fine line here.  I need to find it, stat.

Thursday, November 11, 2010

halloween on a budget

If you enjoy what you find here, be sure to subscribe or become a follower, so you can keep up with all my bloggy goodness.

About a month ago, I posted about how I was going to attempt to make my kids awesome costumes for a total of $40 or less. Did I do it? Absolutely! I couldn't come back here saying I had failed, right?

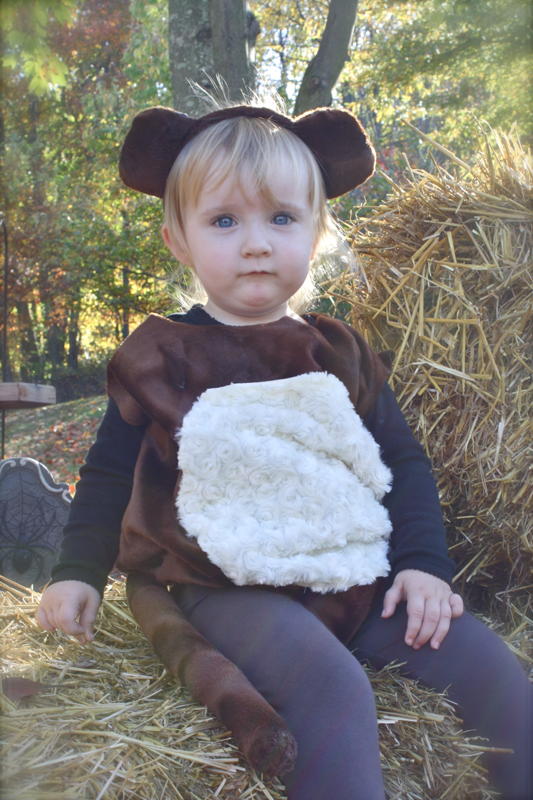
 In my previous post, I had no clue what Alex had wanted to dress up as, but I had determined that Katie would be Little Red Riding Hood.  Well, obviously that didn't work out so well!  My sweet little two year old has a mind of her own and absolutely insisted on being a monkey.  

 Here she is, at our MOMS Club Halloween party.  This is the only time she wore the ears at all.  For this costume, I made a leotard-type shirt out of brown furry fabric, adding a little cream tummy.  The top was baggy enough to give her some more body, so she didn't resemble a skinny monkey, and had a long stuffed tail attached.  The tail was so long it dragged the ground and, if I had it to do over again, I would shorten it just a little because it seemed to bother her a bit.  To make the ears, I wrapped an old headband in matching fabric, sewed and stuffed two semi-circles, and hot-glued it all together.  She wore the get-up with a pair of leggings and a shirt that she already had.  Here's how it breaks down:
Fabric: $10 for a total of 1/2 yard.
Snaps: $2
Total: $12
I had the stuffing, thread, headband, glue, leggings, and shirt on hand.

Alex decided he wanted to be a ghostbuster.  Pretty simple, right?  Well, I had to search all over for a khaki shirt because I waited until the last minute and thought that it would be easy to purchase.  I should have ordered online weeks prior because I went to many stores and a men's size small was the best I could come up with.  That's okay, my little munchkin liked it anyway.  I painted the ghostbuster logo on one sleeve and his name on the left chest pocket.  We paired the shirt with a pair of khaki pants and his belt.  Then, I had to make the proton pack.  I happened to have an old vacuum extension, so that worked out nicely.  I hot-glued that to a piece of foam board, added some faux-tupperware containers, and spray painted the whole thing black.  Then, I dissected a backpack that we never used and stapled the straps to the board.  Grandma completed the outfit by purchasing those goggles at the Spirit of Halloween store.  He loved it!  And, he got more compliments than I even could have imagined for such a homemade costume.

Shirt: $7
Red and white paint: $6
Black spray paint: $1
Tupperware containers: $2
Foam board: $4
Pipe cleaners: $1
Goggles: gift
Total: $21


Total for two costumes: $33.  I even had enough left over to buy that fun Halloween shirt for $5.  Score!


**Photos courtesy of Amy Stamp.

Thursday, October 7, 2010

one mom's guilt trip

If you enjoy what you find here, be sure to subscribe or become a follower, so you can keep up with all my bloggy goodness.


Do you ever feel guilty for not spoiling your children? That's where I am right now.  With two kids, small outings and holidays get expensive pretty quickly if you don't watch what you're doing. 

Before Katie was born, Alex always had deluxe Halloween costumes, but I was working and between my income and Grandma adding bits and pieces (like a leather coat for an Indiana Jones costume), we could do that.  Last year, I made his Jedi costume and it turned out pretty well.  Earlier this year, I made a Luigi costume for him to wear to a birthday party, thinking it would double as his Halloween costume.  However, I neglected to realize that shorts would not be appropriate attire for the end of October.  Oopsie.

So, I've started looking at costumes for both him and Katie.  I've thought about sewing them, and I still may, but I've been browsing the Halloween sites for inspiration.  Good golly!  I kinda forgot that costumes can be so pricey.  To get Alex what he wants, and to buy something cute for Katie, we're looking at nearly $100 just for Halloween costumes.  Is it just me or is that completely crazy?!

So, I want to give them something nice.  I want Alex to be able to dress up as what he wants.  Honestly, I never would have blinked an eye at a forty or fifty dollar costume a few years ago.  Now, I might have waited for it to go on sale, but we still would have spent at least $30 on it.  So, I feel bad that now I'm hesitant to blow that much dough on something that will be worn a maximum of three times in my son's case (he doesn't play dress up anymore).  I also feel guilty because, at age nine, he might not even want to dress up many more times.

My solution is to have him identify a costume he likes and then reproduce it at home for (hopefully) less money.  I'm also going to sew up something for Katie.  We had been looking at a monkey costume for her, but now I'm thinking more along the lines of Little Red Riding Hood.

Since we all know that home crafting projects take on a life of their own, I'm going to challenge myself to really stick to a budget on this one.  Let's say, $40 for two costumes.  Can I do it?  I sure hope so.  I'll post the finished products when I actually finish (you know, after I actually get started).  Want to join me?  Leave a link to your super-fun, budget-friendly homemade costumes below.

Tuesday, August 31, 2010

sneak peek

If you enjoy what you find here, be sure to subscribe or become a follower, so you can keep up with all my bloggy goodness.

Psst... here's a peek at some of the fabric I'm working with for my Fall '10 collections. 


Cream, gray, and deep purple

I'm really loving that central print.

This will become sets of mini pumpkins, like the ones that were so popular last year.
 

Saturday, July 24, 2010

ten things I hate about sewing

  1. My seams never match up when I'm done.
  2. My children won't let me think straight.
  3. Pinning, an unfortunate necessity.
  4. Having to line sheer fabrics (okay, I don't have to, but you don't want to see this girl's granny panties)
  5. My needle always comes unthreaded.
  6. My needle often breaks.
  7. My thread often breaks.
  8. My waist bands are either too wide or too narrow for my elastic,
  9. My waist expands as soon as I finish something I love.
  10. Finding extra bits of thread all over my house all the time.
  11. Finding stick pins in my foot.
Okay, it was supposed to only be ten things, but those pins will get you every time.

Thursday, July 22, 2010

las tres faldas

Every girl needs a pretty, lightweight summer skirt.  Since I'll soon be leaving for vacation, I decided to make three to take along.  I loosely based my patterns on the Market Skirt, a MADE tutorial for little girls.


First up, a blue and white toile-patterned skirt made from an old shower curtain.  Yep, I rescued it from my mom's yard sale pile.  I had to use two layers on this one because the fabric was a bit sheer.  I figured I'd wear it with a gray tank.  Pretty spiffy, I think, for the cost of the elastic and thread.  Total cost: $1.83


Next, I made this tropical floral skirt.  This is kind of a stretchy fabric.  I thought it was pretty when I bought it, but now it looks a little matronly to me.  Eh, that's okay.  Paired with a black top it is a decent combination for a day of shopping or a lunch with friends.  I bought a yard of fabric for $4.50, so this particular skirt only cost $6.33


I think this skirt is my favorite of the bunch.  I bought two yards of each of these fabrics and I'm going to make my daughter sundresses out of the extra.  I think I probably have enough of the light pink to make a sundress and a market skirt for her, but we'll see.  Cutesy?  Yeah, but I don't care.  Total cost for one skirt: $5.81

Tuesday, July 13, 2010

Raggin' It

Do you ever wonder how women survived without Kotex and Tampax?  No monthly trip to the grocery store, or husbands running out in the middle of the night?  No plastic wrappers tucked into purses and plastic bits stuck to their lady bits?  No chemicals, dyes, irritants, and trash?  How did they make it while on the rag in a world of, quite literally, rags?

As Aunt Flo made her monthly appearance and supplies ran short, I made a hasty decision to take care of my little inconvenience the old-fashioned way.  First up: the pad.  I followed an easy-peasy tutorial to sew my own quick stash using an old bath towel, unused baby blankets, and a strip of fleece.  (The fleece actually only made it onto one).  As I finished my first one, I ran to the bathroom to check the fit... quite large and diaper-like, similar to the postpartum pads I received in the hospital.  But, not bad for an overnighter.  With some tweaks and adjustments, I went on to make a couple more with what supplies I had on hand.  Each pad consisted of four layers of flannel and one layer of terry.  Next came the panty-liners.  I'll use these on days when Aunt Flo isn't quite so flow-y.  I made my own quick pattern for these and just used two layers of flannel and one layer of terry.

Today I decided to tackle the question of the reusable tampon.  What to use?  I found a neat set of crocheted ones on etsy, but figured that was too pricey and wouldn't get here quite quick enough.  The same seller offers patterns, but I didn't really want to have to make a special trip to the yarn store.  I imagine, once I get around to crocheting some, I would prefer to use organic, unbleached yarn for such an item anyway.  So, I looked to the internet once more and found the suggestion of using a clean baby sock.  Again, I wasn't really feeling it.  Finally, I decided to cut a prefold diaper into small rectangles, finish the edges, and roll them up.

Off to the bathroom for a try....

I have to admit, I felt a little barbaric shoving a rag up inside my lady bits for the first time.  I really do prefer the tampons with the nice, smooth plastic applicators.  However, my little prefold-rolled rag is working pretty well.  I probably wouldn't go swimming with it, but for around the house it's fine and dandy. 

I feel liberated to not be obligated to throw money at giant companies for a box of plastic and chemicals each month.  I do wonder if using more natural products really does lighten one's flow, as some moms claim.  I suppose it would take a few months to really find out.  At any rate, my new mama cloth stash will come in handy on days when Auntie pops in for an unexpected visit or funds become too tight for tampax.

Wednesday, July 7, 2010

Ten Feet Deep

I always seem to get myself deeply involved in projects that are way too time consuming or completely over my head.  I suppose I am a bit of an idealist, a dreamer, and an overachiever.  But, how would life be interesting if I lived it in any other fashion?

Yesterday's Luigi costume turned out fairly well.  I not only developed my own technique for turning an old pair of jeans into child's overalls, I also mastered using the buttonhole attachment on my sewing machine, repurposed an old green t-shirt into a stylin' cap, and ripped out countless stitches all in the quest for (near) perfection.  Not only that, I did it all with a toddler under foot (or on the table), two irritated, argumentative, pups, and a nine-year old boy who kept asking, "Are you done, yet?"  Just a side note: if you are going to sew with your toddler on top of the table, make sure you allow extra time for oopsies, oh craps, and what-the-hell-was-thats.  In other words, have a seam ripper handy.

Now, my next great adventure entails preparing for a yard sale in 48 hours' time.  I decided to have this sale last weekend, when I became fed up with all the crap that is currently occupying my space.  I didn't start actually working on it until today.  The sale starts Friday at 8 am.  I guess we're down to 36 or so hours now, huh?  I'm going to offer grab bags of some of my older and less commonly-used fabric scraps.  I'm hoping to not only declutter my home, but destash my lopsided bedroom corner which houses all my TattieTats stuff office as well.  Oh, and did I mention that my toddler will be helping during the entire process?  Yeah.  I'll go turn on my coffee maker now.

As much as I love her, I have to admit that Baby K is into everything and then some.  If I pull it out, she puts it back.  If I put it away, she yanks it out.  She's a firecracker, I tell ya.  Just today, I caught her clomping around the house in one of my high heels and one of her brother's Converse sneakers.  You could say she was a little off-balance, just like her mama.

Tuesday, July 6, 2010

Mario Makeover

The Challenge: Design a Mario-themed costume for my son to wear to a birthday party tonight, sans cash

Alex has been invited to a Mario birthday party and all the guests are supposed to come dressed as their favorite Mario character.  Like any socially-awkward nine year old boy who desires to fit in, it is imperative that he show up in a posh Luigi costume, ready to kick butt in this real life Mario Party 7.  The problem is, we don't have the extra funds to throw at a costume, in addition to the birthday boy's present, wrappings, and card.  So, today's task will be to create a super cool Luigi costume for a nine year old boy using things I have around my house.

I plan to use this tutorial to make a green hat from an old long-sleeve tee.  I'll add an "L" for authenticity.  Also, I will be repurposing some old jeans for Luigi's overalls.  Due to today's heat, I'll only have to use one pair to make shorties.  Disaster or not, along the way, I'll take pictures for all to see.

Do you have suggestions?  Please, please, please be kind enough to share.  I'd love to hear them because I'm just a little lost here.

Saturday, February 27, 2010

TattieTats in Progress

So, I've been a bit busy this week trying to design and sew my Spring 2010 line of hair accessories and trying to get the ball rolling with my seasonal and party shop, Kate & Alex.  There's nothing like trying to do it all at once, huh?

I'm excited to be able to offer my crocheted bracelets again this season.  Though a lot of work goes into each one, they just turn out so pretty.
 This is a vintage tablecloth that I purchased at the Hillsville, VA flea market last fall.  It was pretty ugly as far as tablecloths go, but it has potential to become a really pretty bracelet, as you can see by this set of Tattered and Torn bracelets in Mint Julep.  To make bracelets, I have to cut my fabric into strips that are kinda equal in width.  These strips are wide, so I can use them for crochet work, as opposed to the thinner strips I use for the Tattered and Torn bracelets. 

 
Sewing the strips into tubes

Given that each bracelet requires two to three strips of fabric, which is crocheted around a metal bracelet form, and then finished off with intricate hand stitching, I have yet to complete a set for you to see.  However, have patience. They will be ready in due time.

Meanwhile, I've also been busy packaging orders and playing with shamrocks.  I'll tell you about the shamrocks next week, but here's a pic of my pretty packaging:


These packages were being mailed to a repeat customer's two sweet nieces. She ordered two sets of bracelets as presents.  I sure hope they like them!

As for next week, I'll be building leprechaun houses, putting together a diy shamrock banner kit,  starting on my Easter collection for Kate & Alex, and listing more new Spring goodies at TattieTats.  Whew!  It makes me tired just to think of it!


Related Posts with Thumbnails