If you enjoy what you find here, be sure to subscribe or become a follower so you can stay up to date with all my bloggy goodness.
Showing posts with label tutorial. Show all posts

Wednesday, May 4, 2011

stencil and scratch pots

Present your mother with a lovely potted plant this Mother's Day, displayed in a pretty painted planter.


This is a great craft to do with elementary-aged kids, and is do-able for littles.  I did resort to gluing the stencil on the pots so that my two year old wouldn't accidentally paint underneath, but the glue came off well enough (but, my fingernails were too long anyway, so... yeah.)

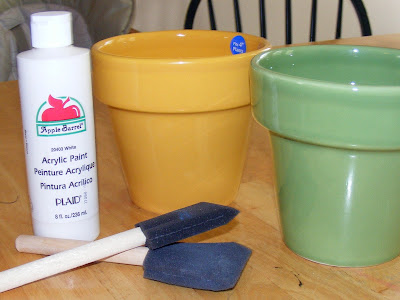
The children and I made two pots for their grandmothers for Mother's Day.  One is green and the other is yellow.  I wanted to buy one green and one red, but Walmart didn't have any red glazed clay pots, so we went with yellow instead.  You'll notice that the yellow pot seems to change colors throughout this tutorial.  I was having a hard time photographing it, both with and without flash.


You'll also need a foam paintbrush, acrylic paint in the color of your choice, clear sealing spray, and a picture.  
I used a drawing of tulips that I found online.  After printing the picture in the size I wanted, I cut out the interior to make a stencil.


Lay the stencil on your pot and tape down.  If you're working with toddlers or young preschoolers, you might want to consider gluing it down.  I used hot glue, which worked okay.  We had some bleeding edges and I had to pick all that dang glue off when we were done, but it served the purpose.  The stencil didn't move an inch!  If you go with hot glue, make sure to stick it down in sections, so that the glue smooshes onto the pot and the edges are pressed down nicely.  This will make it harder to remove, but the end product will look better.


Use your foam brush and acrylic paint to paint the inside of the stencil.  I did 3 light coats.  Make sure the paint is all the way dry in between coats, or the wet paint will rub off when you try to paint over it.  Also, don't put it on too thickly, lest it peels.  After you're all done painting, let the pot dry for 24 hours.

Then, remove the stencil.


If you glued the stencil down, this is what you'll get.  Next, you'll have to pick and scrape off all the glue.  I found that a nylon pan scraper worked best for this.  Be careful not to scrape over the flowers, or even touch them too much, because the acrylic paint will still peel off at this point.


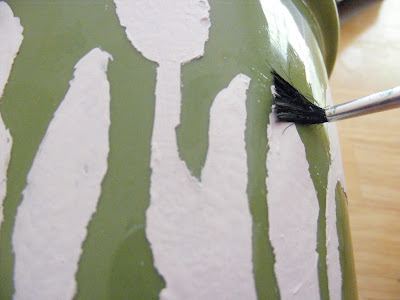
After you have scraped off all the glue, you'll be left with something like this.  This is caused by the paint bleeding under the edges of the paper.  Obviously, if a grown-up is doing this, instead of a child, your bleeding won't be as extensive.  To clean it up, take a toothpick, dip it in some water, and start scratching the excess paint away.  Also use the toothpick to clean up the edges of your flowers.


You may still have a residue of paint specks and glue when you are finished with the toothpick.  In that case, use a small, damp paintbrush to clean up your pot.


After you're done cleaning up your speckles, take a new dampened toothpick and scratch some detail into your flower petals and leaves.


When you're satisfied, go outside and spray your pot with clear coat.


You'll want to do two to three light coats to make sure the acrylic is sealed well.

Let dry. 

Put a plant in there and display or give it to someone else.  I'm torn between planting a flower in each pot or some herbs.  I figure the flower will be more colorful, but the herbs will be more useful.  Regardless, I'm sure the grandmothers will love them, flaws and all.

Tuesday, April 19, 2011

egg craft part two: blow those eggs!


Click here for part one.

Have you gathered your materials yet?
  • eggs (of course!), raw.  We're using chicken eggs, but if you have access to others, feel free to use them as well.
  • paint (any sort)
  • long embroidery needle or hat pin
  • paint brushes
  • hot glue
  • clear spray-on coating
  • beads, buttons, ribbon, trim, etc.
  • modge podge (optional)
  • vintage Easter card pictures (optional)
  • glitter
  • toilet paper tubes for egg holders 
If so, it is time to blow the insides out of your eggs.  We do this so that the eggs will be preserved, without running the risk of having some broken rotten eggs in your home.  I have had success in saving hard boiled eggs, but I really wouldn't recommend it to anyone else.  Furthermore, I have read that you can leave the raw eggs intact and the yolk and innards will dry up into a hard little ball.  However, I would be afraid that the egg would be dropped or somehow broken before it was all dry, leaving an awful stench.  So, if you plan on saving your eggs to use as decorations in subsequent years, it is best to blow them out.


Decide how many eggs you want to decorate.  Leave those eggs in the egg carton and put the others in a bowl in the refrigerator.  It is a whole lot easier to make the holes in the eggs if you let them sit in the carton.   We're doing a dozen.  Let your chosen eggs warm to room temperature.


 Grab your embroidery needle or your hat pin and use it to poke a teeny hole in the top of the eggs.  The small hole should correspond to the small end of the egg. 


Flip the eggs topsy-turvy and poke another hole in the wider end of the egg.  This hole should be larger, but no more than one quarter inch in diameter.  If you can get by with smaller than that, go for it.  I used the same needle and just squiggled it around to widen the gap.  See the difference in size between the egg on the left and the one on the right?

While you have your needle in there, go ahead and pop the yolk.


Then, hold the egg up to your lips and blow that sucker!  You want to blow into the larger hole so that the inside of the egg comes out through the smaller hole.  If that doesn't work, just flip it over and do it the other way.  Be sure to put out a bowl to catch the slime.


It is kind of hard to do and sometimes you just have to let go of your self-esteem and go for it.  When you're done blowing all the eggs, stick the yolk mixture into the fridge and scramble it up for breakfast.  Make sure you cook it within 24 hours. 

Dry your slobber off of your eggs and get ready to paint.

Photo Credit: Happy Easter! by ButterflySha via Flickr

Monday, April 18, 2011

empty tomb cookies

Though we are on "spring break" this week, my children and I are going to spend some time talking about what Easter is really about.  I was looking for fun activities that we could do to illustrate the Easter Story when I came across a recipe for Empty Tomb Cookies.

One Palm Sunday several years ago, I made something similar to this with my Sunday School class.  Instead of cookies, we baked Resurrection Rolls.  The lesson went well.  The children enjoyed being in the kitchen and were very attentive.  While the rolls were baking, we made construction paper palm fronds to carry with us into the sanctuary for worship.

However, in stumbling across this recipe for cookies, I think I have found an even more meaningful activity to do with my own children.  The author outlines activities throughout the lesson that will serve to provide a hands-on understanding of the Easter Story.  Additionally, for each step in the baking process, she provides Scripture to read and discuss.  She completes her tutorial with lovely photographs of her children and her cookies (which look delicious, by the way).

I think my favorite part of the entire recipe is when the children tape the oven closed the night before Easter and allow the cookies to bake overnight.  This gives them something more substantial to be excited over on Easter morning, rather than just what the Easter bunny may have brought.  While our family does the whole Easter bunny ~ basketful of candy ~ hidden egg thing, I really want to work to impart more meaning in the treasured holiday.  This may be our perfect way.

Easter morning, 2010

Sunday, April 17, 2011

the best of both worlds: fabric and crochet toddler dress

When I was a child, crochet magazines used to be a staple in my Granny's home.  While I think she mainly made afghans and doilies, I remember that these little tutorial books often featured clothing.  Exceptionally tacky clothing.  At the age of 5, I swore that I would never wear a crocheted cardigan.  Ever.

source
 My Granny did teach me to crochet a little, and my Grammie followed up with real lessons.  If a solitary stitch was incorrect, I had to pull the whole dag-gone thing out and start again.  It was torture at the hands of an old lady, truly.  But, the lessons taught me to work carefully and take pride in my finished product.

I never finished a project, though, because I worked so slowly.  I would get bored quite easily.  Finally, as a teen, I fashioned a doggie sweater out of granny squares.  Then, as a young mother, I made a monstrous afghan to top my son's bed.  I made it full-sized, so he'd be able to use it forever.  After all, every young man wants to tote around a giant heavy crocheted blankie that his mommy made when he was a baby.

Over the years, I've worked on other projects as well, but always in spurts.  I've made scarves, baby blankets, and various things.  I have, however, never finished a doily or toilet-paper cover.  So, I'm not quite my Granny.  Not yet.

Then, a couple of months ago, I was perusing Prudent Baby, one of my favorite sewing sites, when I came across a tutorial for the Quick Crochet & Fabric Top.  Wonder!  I had stayed away from crocheting actual clothing because of the stigma it was assigned as a young child.  Besides, if I couldn't finish a project, or properly read a pattern more complicated than a flower, then how would I make an article of clothing that could actually be worn?

Anyway, I fell in love with the little shirt that was displayed that day.  I started a search for the perfect fabric, and then the perfect yarn.  Deciding to make  a dress instead of a shirt, I cut my pieces a little longer.  Wanting my daughter to be able to wear it more than one season, I also cut my pieces a little wider.  Then, I sat down to crochet.


Here's a hint: Make sure your chain doesn't twist as you're slip-stitching it into a circle.  I had to crochet that darn neckline three times before I had it right.  But, that was mainly because I wasn't working slowly.  I was trying to whip it out, and didn't pay attention to the details.  I added a second row of treble crochet, which made the neckline more substantial and allows it to really lay in a proper circle.  When I sewed it to the dress, I attached it so that the collar would fold down over the top of the dress as well.  I noticed that, otherwise, the collar stands out from the neck in a rather strange manner.  Altering the pattern in this way requires a binding of some sort around the neckline so you don't have unfinished stringies showing, but I used a piece of scrap ribbon on the inside and it turned out fine.


I also whipped up a little flower hair clippie to match.  To be honest, this is the first thing that I've made Katie that she has willingly put on when I was finished.  Most of the time, she runs and screams when I come after her with a new garment.  I don't know why, but she just prefers to shop.  Maybe she has the same prejudice against handmade that I had as a child.  Maybe I'm tormenting her with pictures of projects that I'd like to accomplish.  Or, maybe she just doesn't like to model.


Sunday, April 3, 2011

ghostbusters party invitation

When I posted about Alex's Ghostbusters party last month, I forgot to mention the invitation.

Alex wanted real movie tickets for invites, but I like to get my invitations printed like photographs because it seems to be cheaper than having it done any other way.  Also, we don't have a color printer.  So, we compromised.


I made this invitation using Publisher and then uploaded it to picnik for sizing.  Sometimes it can be tricky to use an image that you create in Publisher, but it is well-worth it.  The secret to saving is to hold down the CTRL key while you click on all the different parts of the picture.   By all, I really do mean all.  Select all of your little lines and details.  Then, while all of that stuff is selected, right click and select "save as picture."  Then, double check your new file to make sure all of your elements are there.  Sometimes it takes a couple of tries for me to get it right.  So, it is kinda a pain in the ass, but I like the freedom to create all sorts of images without having to know a whole lot about photoshop and those other programs.

After I uploaded the file to picnik and resized it to photo-size, I saved it to my computer and then uploaded to Walmart's photo lab.  You could use any printer you like, but I tend to wait until the last minute and needed my invites fairly quickly.  I really like Walmart's one-hour pick-up time, but I think other drugstores offer the same.

Then, send them out as usual.  Either buy blank envelopes or just address the backs and send them as postcards.  Easy-cheesy, right?

Friday, February 18, 2011

when babylegs won't suffice

If you enjoy what you find here, be sure to subscribe or become a follower, so you can keep up with all my bloggy goodness.

I love the idea of babylegs, and all the different colors and patterns, but I don't like trying to find matching socks and a diaper cover or cute cloth to pair with the outfit on a regular basis. Though Katie has between six and ten pairs of babylegs (I lost count), she rarely wears them.  On the other hand, I LOVE tights, especially tights that are super-cute and can be made at home for only a couple of bucks a pair.  That's why I'm tickled with MaryJanes and Galoshes' newest tutorial on how to turn knee socks into toddler tights.  Enjoy and happy crafting.

Tuesday, February 8, 2011

plaid jumper shirt dress

If you enjoy what you find here, be sure to subscribe or become a follower, so you can keep up with all my bloggy goodness.

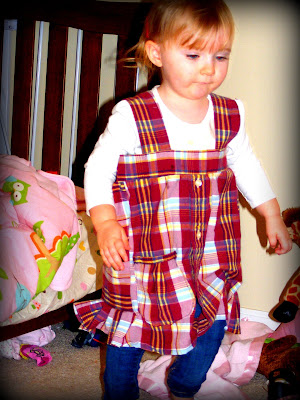
Continuing with my men's dress shirt to toddler dress series, I recently finished this little plaid jumper made from yet another of John's old button-down shirts. Unlike the striped shirt dress, he claims that this was a shirt he actually still enjoyed wearing.  Oopsie.  I'm pretty sure I saved it from last year's yard sale pile, though.  Now, how it got there, I can't quite recall.


To make this little plaid jumper, I followed along with this tutorial by Made By Lex.   I did, however, change it up a little bit.  I added side panels with the pattern going the opposite direction for contrast, only used one pocket, and placed surprise pleats along either side.


See the tiny bit of pleating and the contrasting stripes?  I like how it adds a bit of modernity to an otherwise traditional style.  The straps don't cross in the back and I think they are long enough for her to wear this for quite awhile.  First as a dress, then as a shirt, of course.


Stay tuned for a pink party shirt dress and a lavender tuxedo shirt dress.


Friday, January 28, 2011

striped shirt dress

If you enjoy what you find here, be sure to subscribe or become a follower, so you can keep up with all my bloggy goodness.

Late last summer, I came across a wonderfully cute shirt dress tutorial from liliash.  I knew right away that I HAD to make a dress for Katie, but not wanting her to outgrow it too quickly, I decided to wait until I could include it in this year's spring/ summer wardrobe.  I set aside some of my husband's unloved button-down shirts for just this purpose.  Stay tuned for more variations of this sweet little shirt dress over the next few weeks.


I bought this shirt for John to wear out to a club one night several years ago.  I thought it would be better than his typical weekend tee or polo.  Needless to say, he despised it.  He said it reminded him of a plastic straw from a fast food restaurant.  I think the bold colors are pretty and it makes a gosh-darn cute girl's dress.  The sash was made from a scrap of deep gray fabric and top-stitched in baby pink.

Sweetie Pie Katie seemed to adore the dress, though it is a little short.  (Measure twice, cut once, remember...)  I'll pair it with some skinny jeans for spring or some bright little ruffled bloomers this summer.

Make it!
Here's phia's party dress tutorial for turning a dress shirt into a dress.
The puffy sleeve tutorial can be found here.
I added a couple of little gathered pockets on the front, too.

Thursday, January 27, 2011

the greener cleaner

If you enjoy what you find here, be sure to subscribe or become a follower, so you can keep up with all my bloggy goodness.

While watching the evening news last night, I noticed a story about how Consumer Reports had just tested several different household cleaners, including some "green" ones.  One of the ones that was tested was Seventh Generation, which I can't stand.   Have you ever tried that stuff?  It smells like thyme, which annoys my senses, and doesn't clean up stuck-on messes.  Heck, it doesn't even loosen the grime so that it is scrubbable. 

Last summer, I started making my own all-purpose cleaner, which I adore.  In a spray bottle, I combine the following:
  • 1 scoop borax
  • 1 scoop baking soda
  • 1 cup vinegar
Then, I fill it to the top with hot water and shake.  If I could ever remember to buy some lemon-y scented oil, I might add that, too.  But, it works fine without the scent.

I use this for everything except my windows and mirrors.  I'm still a Windex girl for that.  Plus, I use The Works on my toilet bowls.  But, I don't buy nearly as many cleaners as I used to.

The best thing about it is that it is cheap enough to make so that I don't have a hissy fit everytime Katie decides to help me "clean" something.  And, there is so little borax in the mixture that I don't have to call poison control should she squirt some on her hand and try to eat it (she never has, thank goodness.... but I'm sure it wouldn't be nearly as harmful as Chlorox.)

Thursday, December 16, 2010

short takes

If you enjoy what you find here, be sure to subscribe or become a follower, so you can keep up with all my bloggy goodness.

We're having a snow day today. Alex is out of school, the roads are covered with slippery snow, and we're stuck inside. Today will be a day to relax, make some Christmas crafts, and spend time as a family.

Today, I'm baking a Cinnamon-Apple Cake using some bruised apples from the grocery store.  I don't know if I accidentally bought bruised apples, or if Katie bruised them while shuffling the bag around the house once I got it home.  At any rate, no one has wanted to eat these things and they are about to go to waste.  So, we're going to have a treat.

I'm also planning on making some salt dough ornaments with the kids today.  We'll give these as Christmas presents to teachers and some family.  I can't wait to see how they turn out, as I've never made them before. 

At some point, we'll likely go outside to play.  We're expecting 3-6 inches of snow today, according to the latest reports.  This afternoon, it will turn to sleet and freezing rain, so we'd better get out there while we can!

Wednesday, December 1, 2010

mosaic napkin rings

If you enjoy what you find here, be sure to subscribe or become a follower, so you can keep up with all my bloggy goodness.

Here's a simple craft for kids of all ages. While watching the Macy's parade on Thanksgiving morning, I helped my children make fall-themed mosaic napkin rings to place on the table for our big meal.  Katie had a great time tossing the tissue paper into the air, before smacking them into place on the napkin rings, while Alex was creative and made "3D" versions of the craft by folding the paper in half before gluing it on.


Materials: Red, orange, and yellow tissue paper, cut or torn into small pieces.  Red cardstock cut into 1.5 inch x 3 inch strips.  Glue.  For quick drying, we used glue sticks, but white glue would probably work better.  A stapler with staples.  Patience and a vacuum cleaner also come in handy.


Glue tissue squares to card stock in any pattern you desire. 


See? Nothing on the back.  That way, your ring doesn't accidentally get glued to your napkin if you're a last-minute-mama like me.  When you're finished, curl the ring into an appropriately-sized circle and staple. Cut off excess.


We also cut out and colored some leaves to use as place holders.


The finished table was pretty casual.  Everyday plates paired with paper napkins.  I did pull out the good silverware, though.  Mr. Hull set the table for me.  I think he did a great job.  The napkin rings are wrapped around the napkins and the place cards are laying on the plates.  The centerpiece is just a simple pillar candle on a solid white plate, surrounded by real leaves.  And, the runner?  Four pieces of fall fabric that I had picked up over the summer and had not yet turned into something fancy.  I like the patchwork effect and have folded these up to use again next year.


A Thanksgiving Fable

by Oliver Herford

It was a hungry pussy cat,
upon Thanksgiving morn,
And she watched a thankful little mouse,
that ate an ear of corn.
"If I ate that thankful little mouse,
how thankful he should be,
When he has made a meal himself,
to make a meal for me!
"Then with his thanks for having fed,
and his thanks for feeding me,
With all his thankfulness inside,
how thankful I shall be!"
Thus mused the hungry pussy cat,
upon Thanksgiving Day;
But the little mouse had overheard
and declined (with thanks) to stay.

Thursday, August 19, 2010

Homemade Playdough

It has been a rainy week in our corner of Virginia.  I think Monday was nice, but all the other days have threatened rain and/or poured.  By day three, the kids were seriously needing some sort of diversion, so my son and I created some homemade playdough while Baby Kate was napping yesterday.  We used this recipe, but modified it with whole wheat flour (a staple in our home), so our colors were a bit off.  Oh well, it still tastes works the same. (recipe follows)


Start with this...
and a silly boy...

measure it out...
mix it up, over medium heat...
Alex said it looked a bit like goop.
When it forms a ball, dump it out.
Divide and Color
Ta-da!
Don't forget to wash those hands!

Ingredients:
  • plain white flour – 1 cup
  • salt – 1/2 cup
  • cream of tartar – 2 tsp
  • water – 1 cup
  • cooking oil – 1 tsp
  • food coloring
Steps:
  • Mix all the ingredients together in a pot until the mixture is smooth and one solid color
  • The official recipe says, "bring to a boil over medium heat." However, I don't see how a lump of goo can boil.  So, heat it up until the playdough goops together into a ball, stirring continuously so it doesn't burn.
  • Dump it out on the counter.
  • Divide it into chunks and add food coloring.  
  • Knead for a few minutes.
  • Let cool.
  • Play!
  • When finished, store in a baggie.

Thursday, July 22, 2010

las tres faldas

Every girl needs a pretty, lightweight summer skirt.  Since I'll soon be leaving for vacation, I decided to make three to take along.  I loosely based my patterns on the Market Skirt, a MADE tutorial for little girls.


First up, a blue and white toile-patterned skirt made from an old shower curtain.  Yep, I rescued it from my mom's yard sale pile.  I had to use two layers on this one because the fabric was a bit sheer.  I figured I'd wear it with a gray tank.  Pretty spiffy, I think, for the cost of the elastic and thread.  Total cost: $1.83


Next, I made this tropical floral skirt.  This is kind of a stretchy fabric.  I thought it was pretty when I bought it, but now it looks a little matronly to me.  Eh, that's okay.  Paired with a black top it is a decent combination for a day of shopping or a lunch with friends.  I bought a yard of fabric for $4.50, so this particular skirt only cost $6.33


I think this skirt is my favorite of the bunch.  I bought two yards of each of these fabrics and I'm going to make my daughter sundresses out of the extra.  I think I probably have enough of the light pink to make a sundress and a market skirt for her, but we'll see.  Cutesy?  Yeah, but I don't care.  Total cost for one skirt: $5.81
Related Posts with Thumbnails